
This is an old revision of the document!
Table of Contents
OOBDAndroid Betriebsanleitung
Darstellung einer älteren beta version

Einige Worte über Android Smartphones und OOBD
Bevor Du beschliesst, Geld für ein eigenes Android Smartphone, speziell fuer Diagnosezwecke wie OOBD, zu investieren, solltest Du ein wichtiges Detail berücksichtigen: OOBD nutzt das sogenannte Bluetooth SPP Profil um mit Deinem Android Smartphone über eine serielle Verbindung mit dem OOBD Can-Invader zu kommunizieren. Aber zumindest in einigen günstigen Android Smartphones ist dieses NICHT eingebaut (sie unterstützen dann nur Bluetooth Headsets), und deshalb musst Du sicherstellen das Dein Gerät Bluetooth SPP unterstützt, andernfalls wird OOBD-Android nicht mit dem CAN-Invader verbunden werden können!
Nachdem Du ein Smartphone gefunden hast, was diesen Standard unterstützt, musst Du berücksichtigen das Dein Smartphone mit dem eventuell vorhandenen so genannten “Device Zero” Programmfehler dein Vorhaben vereitelt. Dieser Programmfehler verhindert das der OOBD CAN-Invader von Deinem Smartphone bei der Suche nach bluetooth fähigen Endgeräten gefunden werden kann. Aber dann können wir Dir hier mit einer Umgehungslösung helfen!
Einrichtung:
- Installiere den OI Filemanager aus dem Google Play Store auf deinem Android Smartphone.
- Lade das aktuellste zip-Archiv von OOBDAndroid von unserer Download area. In diesem Zip Archiv ist ein kompletter Ornder mit dem Namen OOBD. Entpacke diesen und kopiere Ihn mit seinem Inhalt in das, Achtung wichtig! * ROOT-Verzeichnis deiner Android SD-Karte deines Android Smartphones.
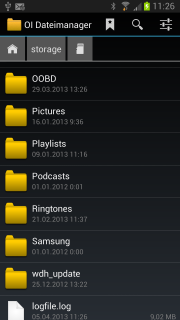
- wenn Du bereits ein paar persönliche scripts (*.lbc) erstellt hast, speichere Diese auch in diesem OOBD Ordner.
- Als nächstes starte den OI Dateimanager, den Du in Schritt 1 bereits auf deinem Android Smartphone installiert hast. Navigiere in den OOBD Ordner den Du in Schritt 2 erstellt hast.
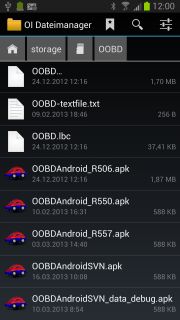
- In that OOBD folder you'll find the OOBDAndroid…apk file. Install this by selecting the file. You might get asked to allow to install software packets (like OOBD), which do not come direct out of the Play Store.
- After installation is done, go into your System Bluetooth settings. Make sure Bluetooth is switched on
- If not already done before, pair your mobile phone with the OOBD dongle, so that the dongle becomes a known device to your android device. Otherwise it would not appear in the OOBD settings.


Settings
Under Menu/Settings please select your OBD device. If it not appears in the list, then you've forgotten to pair it before 

Mainscreen
Select the script you want to run and press the round Button to start

The Diagnose Screen

The Diagnose screen consists of two tabbed panes, the Diagnose pane and the Output pane
The Diagnose Pane
The Diagose Pane  contains two buttons and a list of items.
The Item list
In the Item list you'll find the description of the item, the actual value and a set of flags
The Item flags
| Symbol | Name | Meaning |
|---|---|---|
 | Back | Indicates the jump back to the previous menu |
 | Update | Item will be updated when the Update Button is pressed |
 | Permanent Update | Item will be updated permanently as long the Timer Toggle Button is active |
 | Log Changes | When value changes, new value will be written to output Combined with Permanent Update, this will create a continious log |
 | Submenu | No function, just a visual indicator for a further sub menu |
The Update Button
The Update Button starts an update of all actual visible items, which are marked with the update flag ![]()
The Timer Button
The Timer Button updates all actual visible items permanently, which are marked with the timer flag ![]()
The Back- Button
If the user selects the Back- Button, which is part of the mobile phone itself, it is checked if the item list contains any items which are marked with the Back flag ![]() . If yes, the first found item is called, which then jumps back to the previous menu.
. If yes, the first found item is called, which then jumps back to the previous menu.
If no such item is found, the program jumps back to the main screen.
Changing the item flags

The item flags can be changed by selecting the item and keep the item pressed until a context menu pops up. There the flag to change can be selected.
The Output Pane

The Output Pane contains a button row and a text field. The textfield is editable, so an output can be changed before saving or sending.
The Output functions:
| Symbol | Name | Meaning |
|---|---|---|
 | Clear | Clears the textfield |
| - | Logging Active | If inactive, no futher text will be added to the output |
 | Store | Allows to save the text or send it by one of the available message channels like Email, Twitter etc., depenting on the actual Android device settings |
Bugs
As said, AndroidOOBD is still in beta state. If something seems to be wrong or is not working as expected, please check the OOBD- Bugtracker is this is a known problem. Please feel free to add comments to the known bugs or raise new ones. Please respect that bugs reported just by email or only verbaly will not be considered.